- Installation and initial setup
Installation and initial setup
TrueConf Server comprises a number of components:
- TrueConf Server system services
Administrator control panel;
Guest page.
TrueConf Server system services
This component is a video conferencing server itself. It gets installed as Windows operating system service and provides:
endpoints authentication and authorization
support for multi-point video conferences and point-to-point video calls
events logging (calls history, usage statistics and chat messages)
traverse NAT and proxy servers to connect endpoints
scalable video coding (SVC) manipulations to media streams
transcoding for third-party protocols and systems (SIP, H.323, RTSP, WebRTC and Skype for Business)
communication with remote federated servers.
Administrator control panel
This component is used to control and modify TrueConf Server configuration during its operation. The control panel provides the following capabilities:
launching and installing the server (as well as monitoring its current state)
viewing server reports (log files) and all user actions (call history, message history, connection history, etc.)
setting conference recording and viewing the records
managing user accounts and their personal settings (as well as combining users into groups with similar settings)
configuring TrueConf Server API access.
TrueConf Server Features
TrueConf Server core features can be extended by the following TrueConf solutions connected to it:- TrueConf for Windows, Linux, macOS;
- TrueConf for Android;
- TrueConf for Android TV;
- TrueConf for iOS/iPadOS;
- TrueConf Room;
- TrueConf Kiosk;
- TrueConf Videobar.
Supported protocols and codecs
Protocols
Proprietary SVC-based TrueConf protocol used by all client applications.
H.323 protocol set: H.239 for content sharing; H.281, H.224, Q.922 for camera control; H.235 for media stream encryption; H.225, H.241, H.245 signaling protocols.
SIP protocol set: BFCP for content sharing; FECC for camera control; SRTP for media stream encryption; TLS for signaling protocol protection.
WebRTC: SRTP and DTLS for media stream encryption.
RTSP video calls.
QoS support: DSCP, DiffServ.
- AES-256 encryption support..
Work with TrueConf API using OAuth 2.0 protocol.
Supported video codecs
- VP8 SVC, VP8, H.264, H.264 AVC, H.264 SVC, X-H264UC, H.263, H.263+, H.263++
Supported audio codecs
- Opus, G.711, G.722, G.722.1, G.722.1C, G.723, G.728, G.729A, Speex, MP3, AAC
Features
Automatic search for available TCP ports for TrueConf Server control panel and database during the installation process. You can also set ports manually.
Offline server registration (unavailable with TrueConf Server Free).
Operation in LAN/VPN (unavailable with TrueConf Server Free).
Set a minimal available version for TrueConf client apps used for calls and conferences.
Add new features to your TrueConf Server using additional extensions.
Back up and restore server settings.
Configure external and internal addresses of your TrueConf Server instance.
Send email invitations and newsletters to your users via external SMTP server.
Create and edit email templates.
Run video calls and conferences with users of other TrueConf Server instances (unavailable with TrueConf Server Free).
Built-in gateway for SIP 2.0, H.323 and RTSP protocols.
Configure video conferencing quality for WebRTC users and H.323/SIP/RTSP devices.
Configure video conferencing recording quality.
Brand your guest page and indicate administrator’s contact information.
Limit access to the TrueConf Server control panel for certain admin roles or with the help of an IP filter.
Create admin accounts with read-only access to the TrueConf Server control panel designed for server monitoring.
Configure HTTPS (e.g., changing ports, using a self-signed or commercial certificate).
Integration with third-party video conferencing platforms.
Add new user accounts or edit and delete existing ones.
Create, edit and delete groups, include or exclude users from groups, change user rights within a group.
Create an address book and specify individual application settings for both individual users and user groups.
Add an alias for SIP/H.323/RTSP devices or for a user from another TrueConf Server instance to make it easier to call them.
Store TrueConf Server user account data either locally or using a third-party service implementing LDAP protocol (LDAP/Active Directory extension required).
Data transmission between conference participants bypassing the server (UDP Multicast Conferences extension is required).
Create new conferences and webinars, edit and stop running meetings.
Schedule conferences with weekly recurrence on specific days.
Add and remove participants from ongoing conferences.
Configure a general layout for all participants, as well as an individual layout for each user and SIP/H.323/WebRTC participants.
Automatic recording of all conferences or only required ones.
Online webinars with guest connections (requires Public Web Conferences extension).
Conference streaming via CDNvideo, Wowza Streaming Engine, Wowza Streaming Cloud, YouTube, etc. (requires Streaming extension).
Create new conference templates or edit existing templates.
View reports about connections, calls, messages, statuses and user devices.
Export reports in CSV format.
Configure conference recordings, view them directly in the TrueConf Server control panel with video and chat synchronized (for .mp4 format only), download and delete them.
Configure server storage for files transmitted in conferences.
Extend your video conferencing capabilities using developer tools (TrueConf SDK and API).
Deploy a system based on multiple video conferencing servers with TrueConf Enterprise.
System requirements for TrueConf Server
| Basic configuration | Recommended configuration | |||
|---|---|---|---|---|
| CPU |
Intel Core i3-8100 @ 3.6 GHz
Intel Core i5-7400 @ 3.0 GHz Intel Xeon E3-1270 v5 @ 3.6 GHz or any other CPU with at least 4 logical cores and PassMark® CPU mark 7000+ |
Intel Core i7-8700 @ 3.2 GHz
AMD Ryzen 7 2700 @ 3.2 GHz Intel Core i7-7700K @ 4.2 GHz Intel Xeon E5-1680 v4 @ 3.4 GHz Intel Xeon E5-2667 v4 @ 3.2 GHz or any other CPU with at least 8 logical cores and PassMark® CPU mark 12000+ | ||
| Typical configurations capabilities |
| |||
|
| |||
| Other examples of typical configurations → | ||||
| GPU-based hardware acceleration | With NVIDIA Quadro P2000 (or a comparable graphics card), you can add 20 individual layouts for SIP/H.323 participants without changing other hardware. | |||
| Operating system |
Dedicated or virtual Microsoft Windows Server 2012/2016/2019 (including Core editions) with the latest updates installed.
A beta version for Debian is now available. | |||
| RAM | 8 GB | 16 GB and more | ||
| Hard drive | 20 GB of free space | |||
| Network | Ethernet 1 Gbit/s | |||
| Ports |
| |||
| IP | A static IP address is required for the server to work properly | |||
| Supported hypervisors | Microsoft® Hyper-V, Xen, KVM, Oracle VM VirtualBox, VMware Workstation and ESXi. | |||
What is a registration key and how to get one?
Before installing TrueConf Server, please make sure you have a registration key. It is a unique secret combination of characters that identifies licenses for your TrueConf Server instance. You have probably received a registration key when downloading TrueConf Server from our official website or when purchasing it from one of our partners. In this case, skip this step and proceed to TrueConf Server installation process.
If you do not have a key, you can receive a free license by clicking the Download free version button on the TrueConf Server Free webpage.
A detailed comparison of the free and paid versions of TrueConf Server is available on the pricing page.
Here you will find a TrueConf Server Free download form:
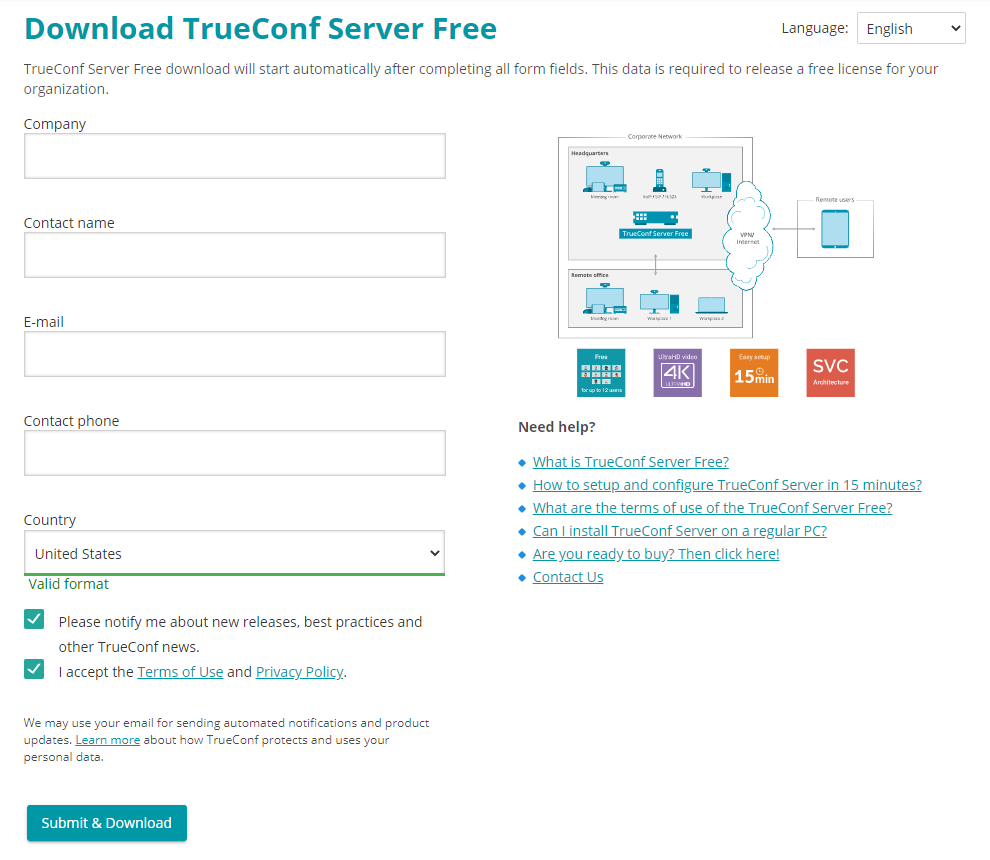
A registration key will be sent to the email address that you provided:
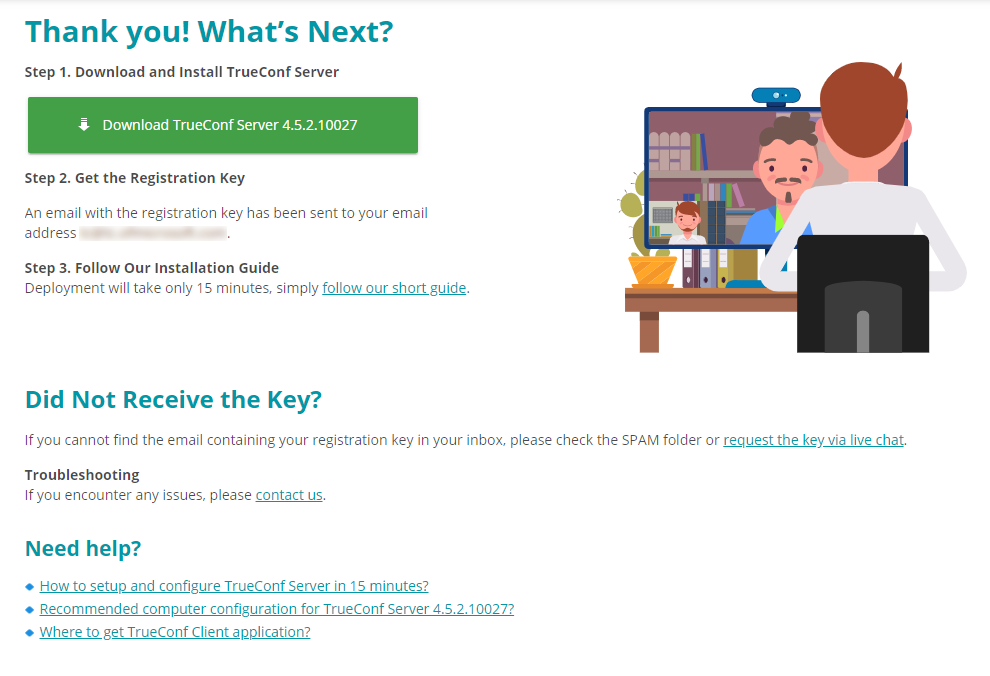
You will receive the key within 15 minutes
If you did not receive the key, please contact us in any way convenient to you or check your SPAM email folder.
Installation
TrueConf Server is distributed as a software installation package that contains the server side components and client applications for Windows PC. TrueConf client applications for other popular platforms are available on TrueConf website (alternatively, you can find the download links on the guest page).
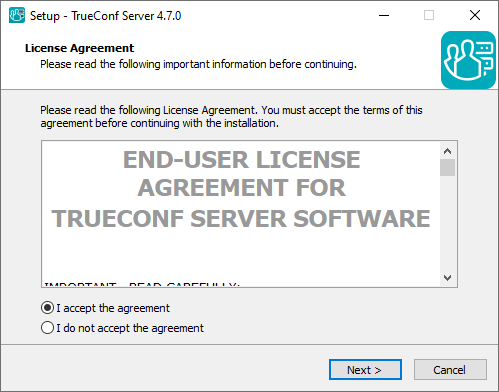
Download and run the distributive to start the installation. The installation process will take not more than a minute.
During the installation you can specify:
TCP port for accessing control panel over HTTP
TCP port of the database for server reports.
Database port for server reports is set to 5432 by default. It is selected during the installation process and cannot be changed afterwards (to change it you will need to re-install TrueConf Server). The control panel is given port 80 or 8888 (if port 80 is unavailable). If both port 80 and 8888 are unavailable, you will need to specify it manually during the installation process.
If control panel port is not 80 (HTTP) or 443 (HTTPS), you need to specify it manually in the host name after the colon in the browser URL bar (e.g. http://localhost:8080).
Can I install TrueConf Server on a PC with a web server already installed?
Yes. The installer will either automatically select available port, or give you the option to assign the port manually.
Your browser will automatically open TrueConf Server control panel after installation.
If you are installing TrueConf Server behind the firewall, in order to complete the registration process you should open TCP port 4310 to allow access to our registration server located at reg.trueconf.com.
How to change the port for control panel access without reinstalling TrueConf Server
For Windows OS: go to the TrueConf Server working directory (C:\Program Files\TrueConf Server\httpconf\conf by default) and open the listen.conf file using a text editor (administrator rights required). Change the port number in the Listen <port number> parameter (e.g. Listen 8888) and save changes. After that please reboot the computer on which TrueConf Server is installed.
For Debian OS: go to the /opt/trueconf/server/etc/webmanager/ directory with superuser rights and open the httpd.conf file with a text editor. Change the port number in the Listen <port number> parameter (e.g. Listen 8888) and save changes. After that please restart the web server service using the following command:
$ systemctl restart trueconf-web
Registration process
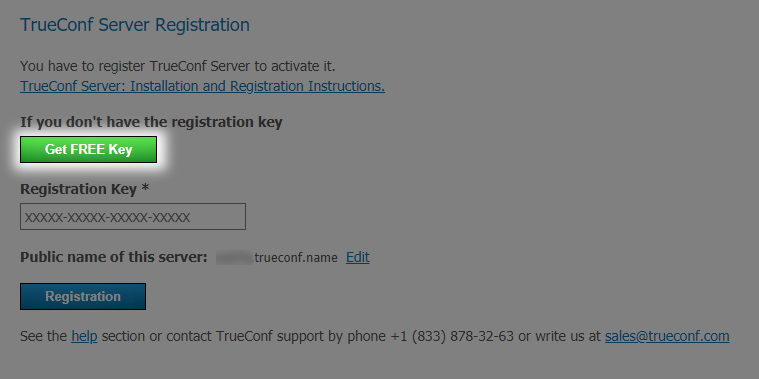
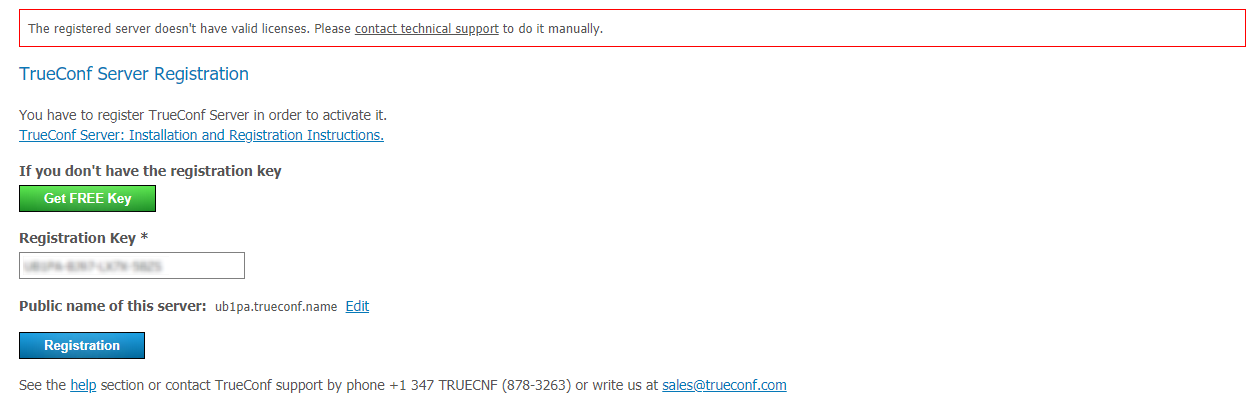
Register the server. To do this, you will need to enter the registration key you have received earlier.
Go back to the TrueConf Server setup page, enter your key in the Registration Key field and click the Registration button:
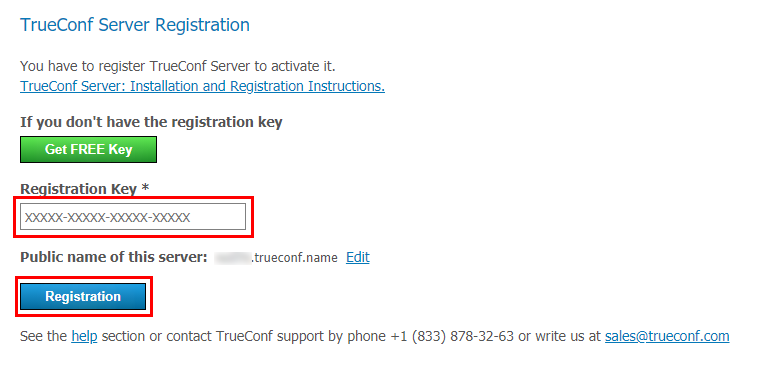
If you do not have a key, click the Get FREE Key button on the TrueConf Server registration page and follow the instructions above:
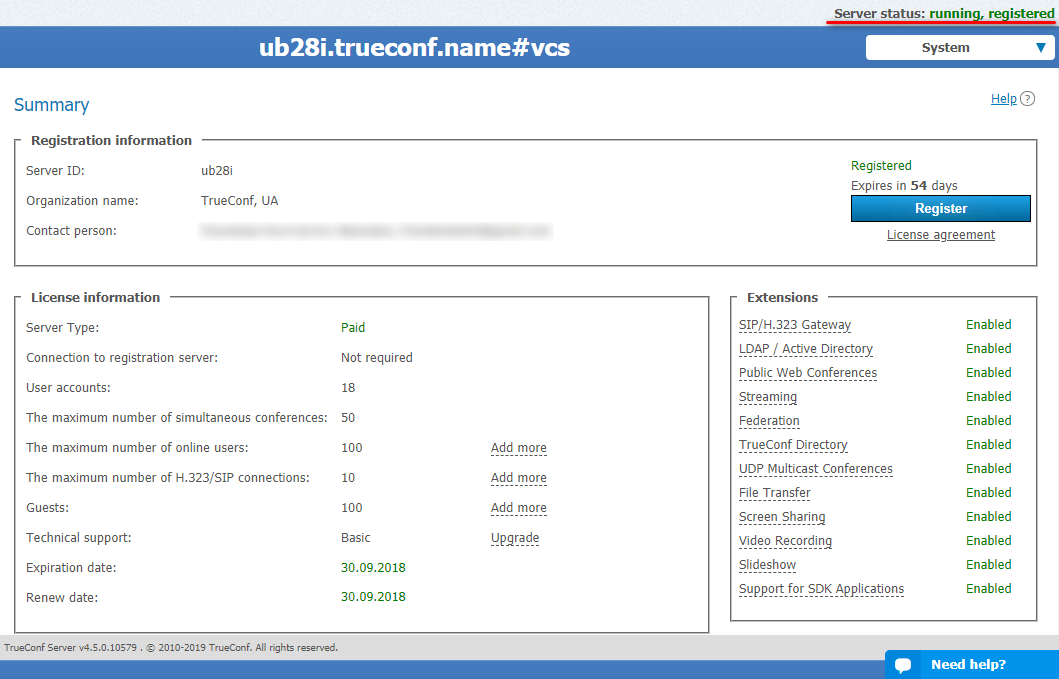
Once TrueConf Server has been successfully registered, you will see running, registered at the top right corner of the control panel window:
Offline registration
To register offline on a computer without an Internet connection, you will need a device connected to the Internet to obtain a registration key. On that device, go to trial registration page on our website and follow the instruction from the Registration section.
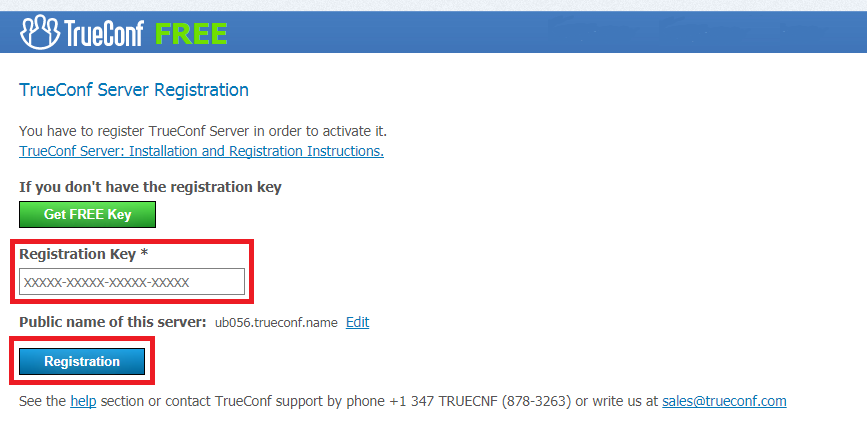
Once you have received an email containing your registration key, open the control panel on a PC without Internet connection, enter the key into the Registration Key field and press Registration:
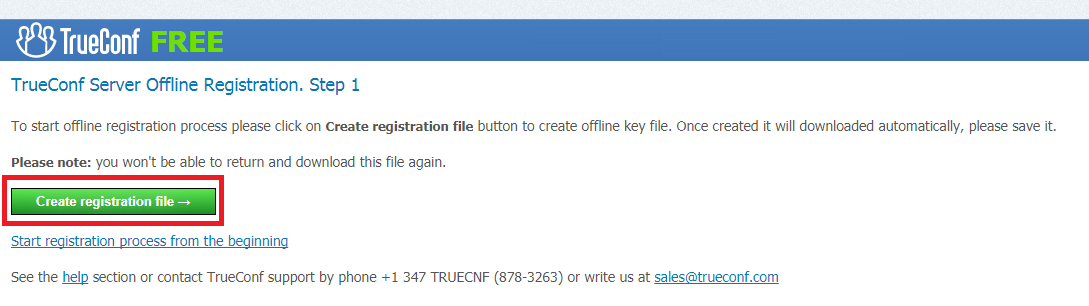
Create registration file button will appear in the registration window. Click on it to generate a file with your registration information:
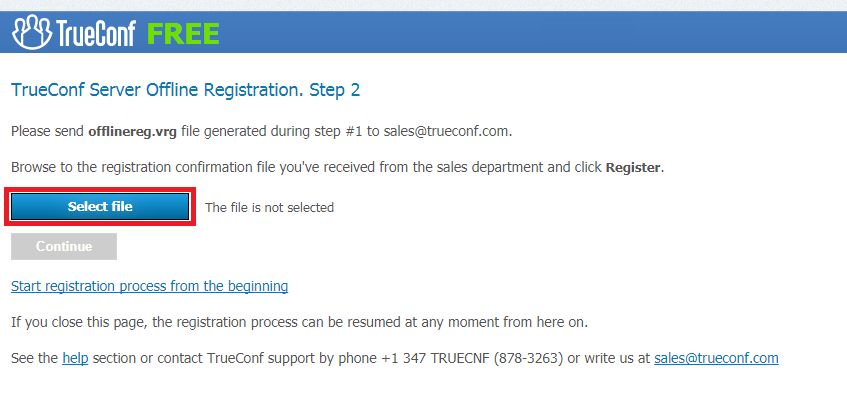
The generated file offlinereg.vrg will be saved in your browser’s Download folder. Please send the file to sales@trueconf.com. You will receive a file that needs to be installed on the PC with the offline-registered server.
Please do not try to restart offline registration until your receive a respond to your request. If you restart offline registration, you will need to retry the whole process.
Click on Select file and select file offline2.vrg. Then click Continue:
If the offline registration has been successful, you will be notified that TrueConf Server has been successfully registered in the control panel.
Can I register TrueConf Server Free without an Internet connection?
No, this feature is only available to those users who purchased annual or lifetime TrueConf Server license. If you need a trial version of TrueConf Server that operates without Internet connection, feel free to contact us.
Control panel access settings
By default TrueConf Server can be administered from any computer in the same local network where it was installed. In other words, by default access is limited to the following ranges of IP addresses: 10.*, 192.168.*, 172.16-172.31, 127.*. If the administrator wants to administer the server from a remote machine, he/she needs to make sure that the firewall allows incoming connections over TCP port chosen for the control panel (80 by default) and that this option has been enabled in the security section of TrueConf Server control panel.
To gain remote access, log in using your Windows account information from one of the following groups:
TrueConf Server Admin to administer the server
TrueConf Server Security Admin to view logs and conference recordings.
When the server is installed, the user’s current account is added to the first group. To make the control panel accessible to another user, the administrator should add this user’s account to one of the groups.
If Allow admin access from localhost without authentication option is checked in the Web → Security section, the control panel can be accessed directly without authorization from the machine where the server was installed via localhost or 127.0.0.1 host in any browser.
See also
How to administer the TrueConf Server outside of LAN
- How to connect external users
Changing the registration key
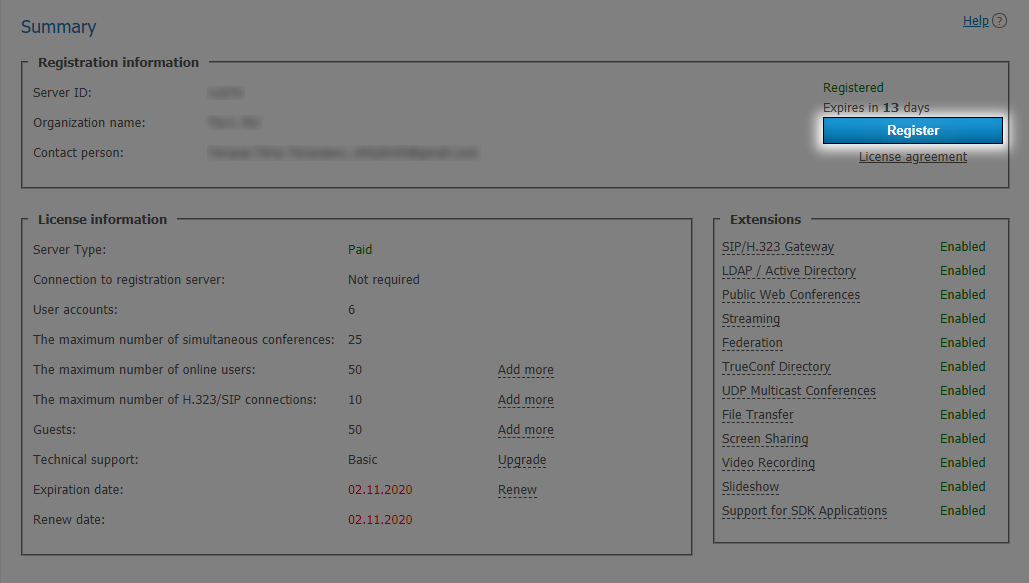
To change the registration key, proceed to Dashboard → Summary and click Registration button.
What should I do if I get the message "Computer change is not available for this server code" when changing the key?
It means that your key is "bound" to the computer where the server was installed. To disable this binding, please contact us in any convenient way.
If you get the message The registered server doesn't have valid licenses. upon entering the key, it means either that the key has expired or the time and date on your PC have busted. Make sure that time and date are specified correctly on your PC.
Server status
Server status is shown in the Server status field in green (if the server is working) or in red (if it has stopped) in top right corner of the control panel:
What to do if server is not running?
Stopped status is displayed in the Server status string.
There are three possible reasons for this:
Invalid license: contact your system supplier to get a license.
Some server files are missing or have been damaged: reinstall TrueConf Server (see Installation)
The hardware key is invalid: check the manual to fix the hardware key issues.
Server log
If you encounter any issues with TrueConf Server, TrueConf support team will be able to help you troubleshoot them more efficiently if you provide your server log files. To access the log, go to System → Server log located in the top right corner of the control panel.
Check Enable detailed logging in Dashboard → Settings section of the control panel to collect more detailed information in your server logs. Our technical support managers may ask you to do it to ease the troubleshooting process.

You can download the logs by clicking on the save icon above the log:

Configuring preferences
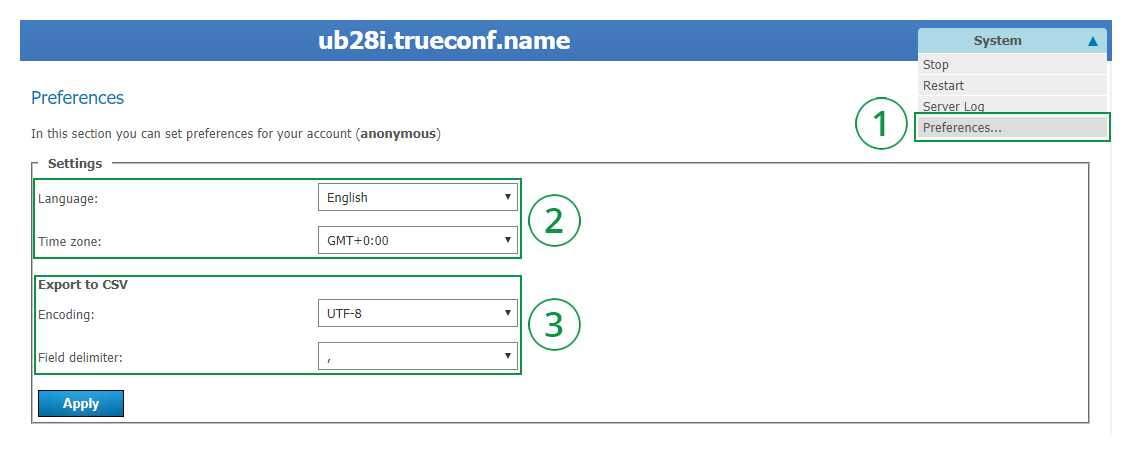
Each server administrator can select their own individual preferences.. You can access these settings in System → Preferences section.
Personal preferences include interface language of the control panel and a timezone. You can also set report export parameters (encoding and field delimiter to convert the table string to text format) in the Export to CSV section.
After making any changes make sure to click Apply button.
Shortcut for Preferences section
Interface preferences
Reports file export preferences
Adding users
Where can I find client applications
Send out the link to the guest page to your users to allow them to connect to your video conferencing system. They will be able to download client applications for any supported platform on the guest page.
The guest page is available at http[s]://<server>[:<port>] where:
<server>- address of the PC with TrueConf Server installed<port>- port used to access the control panel (if you are using default80port, you don't need to specify it)
For example:
https://videoserver.company.comhttp://100.120.12.12:7777
You can configure the guest page URL in the Web → Settings section of the control panel.
How to connect client application to TrueConf Server
You need to specify the server address in the network settings of your client application so that your client application can connect to your TrueConf Server instance and your users can authorize. You can either do it manually or let your client application find the server automatically via DNS.
Once connected to the server user will be prompted to authenticate on this TrueConf Server instance with username and password.
Client application manual setting
Users can configure connection to TrueConf Server manually. In order to do it, you need to specify the TrueConf Server address and connection port manually in the application network settings menu (or upon the first application launch). You can find detailed instructions on how to connect an application to the server on the guest page.
Client application automatic settings
Desktop client applications can automatically search for local TrueConf Server instance. To make this possible administrator needs to specify the address of the server in primary DNS suffix by creating a new SRV record for vcs2 service.
The following example shows how to do this using DNS utility in Microsoft Windows 2012 Server:
Choose Other New Records… in a right-click menu
Choose type «Service Location (SRV)»
Set the following parameters.
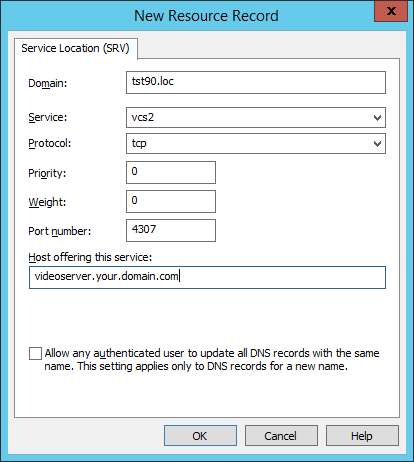
In this example the TrueConf Server instance has videoserver.your.domain.com address and port 4307. Please make sure that protocol name (tcp) does not contain underscores.