Personal area
Personal area is a server-hosted web page designed for scheduling conferences or editing personal data or the address book.
Unlike the control panel which is accessible only to the administrator, this web page is available to every user.
How to sign in
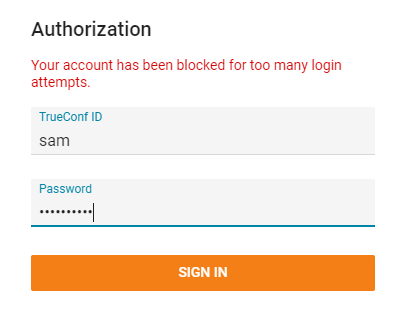
On the server guest page, click the Sign in button in the upper right corner. Enter your username and password.
You can request the administrator to provide access credentials for the guest page.
After 10 failed attempts to enter your password, authorization via web application will be blocked for 24 hours. To unlock your account manually, please contact your server administrator.
Main page
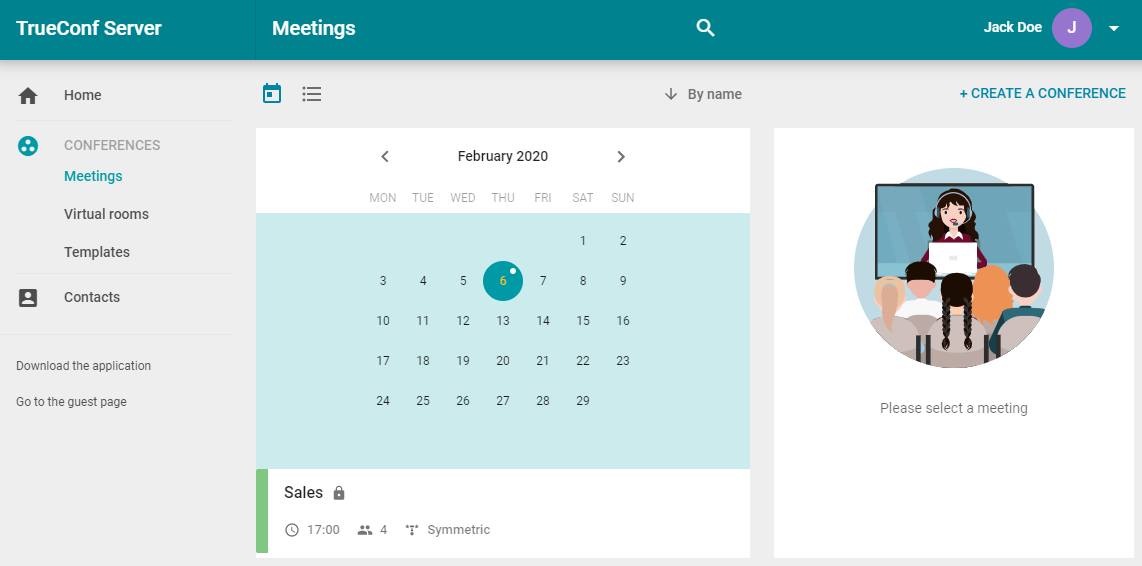
Once you have signed in, you will see a list of conferences scheduled for today and virtual rooms (up to 5) below on the main page.

Click on a conference to check its details. The right sidebar displays basic information and control buttons. You can export a scheduled conference to your Google Calendar, Outlook, etc.
Go to Profile Settings to change your account information and interface language.
View a right list
The right sidebar displays the list of options available to you:
making calls
creating group conferences
editing the address book
using collaboration tools
operator rights.
If any of these features is unavailable to you, contact the server administrator and ask for a list of rights given to you.
Making video calls
A video call is a mode involving two participants who can see and hear each other.
If this feature is unavailable to you, you won't be able to make video calls but, only receive incoming calls.
Creating group conferences
With TrueConf client applications, you can create three types of group conferences:
Symmetric conference is a video conference where all participants can see and hear each other.
Asymmetric conference (webinar or video lecture) is a conference where the moderator can see all the participants while the participants can only see the moderator.
Role-based conference (virtual meeting) is a conference where participants can only see and hear active speakers. Any participant can become an active speaker; to do it, he/she has to be approved by the moderator.
If this option is unavailable, you will be able only to join conferences, but not create them.
Editing the address book
Address book is a list of contacts (both user accounts and call strings) that a TrueConf Server user can view and browse from a client application.
If this feature is unavailable, you will only be able to see the address book provided by the server administrator without being able to edit it.
Using collaboration tools
This feature allows TrueConf client application users to share content, show slides, and control a remote desktop.
Operator rights
This right enables you to automatically receive operator status in any conference that you will join. No participant, including the conference owner, will be able to deprive you of these rights.
Operator is a conference participant who is allowed to:
Invite users to a conference
Remove users from a conference
Invite to the "podium" or take it without asking for a permission (in a role-based conference)
End a conference for all participants
Set up video window layouts for participants and control their audio and video devices.
Profile settings
Go to Profile settings to edit data.
Click Make a photo button to create an avatar using a webcam.
You may need to give the browser access to your webcam to take a photo.
Changing the language is available on Other settings tab.
Conference scheduling
You will be able to create conferences only if this right is given to you by the administrator.
To create a conference, click New conference or New room on the main page.
Please select a conference type:
Private (by default) – only registered users can join the meeting;
- Public (webinar) – both registered and unregistered users can join.
The launch mode will be set automatically. Click Continue or select a template to go to the main settings.
"General" tab
Specify:
Conference name
Mode (Symmetric mode is set by default)
Number of active speakers if role-based mode is selected
Conference type: scheduled meeting or a virtual room
Start date and time, and, if necessary, recurrence frequency for a scheduled conference.
Сheck the Save as template box to create conferences with the same settings in one click in the future.
"Participants" tab
Go to the Participants tab and add users to a conference in one of the following ways:
From the address book
Using TrueConf ID
By specifying a call string for a SIP/H.323 or RTSP device
By email (only for public conferences).
"Layout" tab
On the Layout tab, you can select the default layout for all conference participants or for each one individually.
Layout editing is unavailable for asymmetric video conferences.
To set a layout:
Specify a layout type.
Select the number of video windows.
If necessary, add an additional video window to share content.
Assign a participant to each video window or click Auto-fill layout (you can also change the order of video windows with the mouse). You can use full-screen mode for convenient layout settings.
Choose where the username should be located (at the top or bottom of a video window)
If necessary, check the box Do not allow users to change the layout.
"Additional" tab
Set up the following parameters on the Additional tab:
Connecting to the conference without invitation (for private conferences only)
- Conference ID and permissions for participants (for public conferences only)
Conference recording
Sending email invitations to participants.
Working with conferences
Lists of conferences are displayed in Meetings and Virtual rooms sections.
Once a conference is selected, you can see basic information about it:
Number of invited participants
- Conference ID
- Conference mode
Conference URL.
Calendar is displayed above the list of conferences in the Meetings section. Select a date to see a list of conferences scheduled for that day.
Conferences scheduled for today are displayed on the main page.
Use  and
and  buttons at the top to switch between the calendar and the list of all scheduled conferences:
You can change and lock video layouts and manage participants’ devices while the meeting is in progress.
This feature is only available for conference owners and operators.
The default pane location for the participants included in the video layout (all participants for symmetric conferences and moderators for role-based conferences) is as follows: the first user who joins the meeting is located in the upper left corner of the screen.
Changing video layouts
Select a video conference in the Meetings or Virtual rooms section and click Сonference manager in the panel that appears on the right.
Events created on the fly in the Сonference manager section of the TrueConf client application are not included in these lists.
Advanced meeting management window opens in a new tab. Here, indicate the video layout mode that you want to apply:
for all participants
for SIP/H.323 and WebRTC users
individual video layout for a specific meeting participant.
This section is unavailable for asymmetric conferences.
After that you will proceed to the layout control panel.
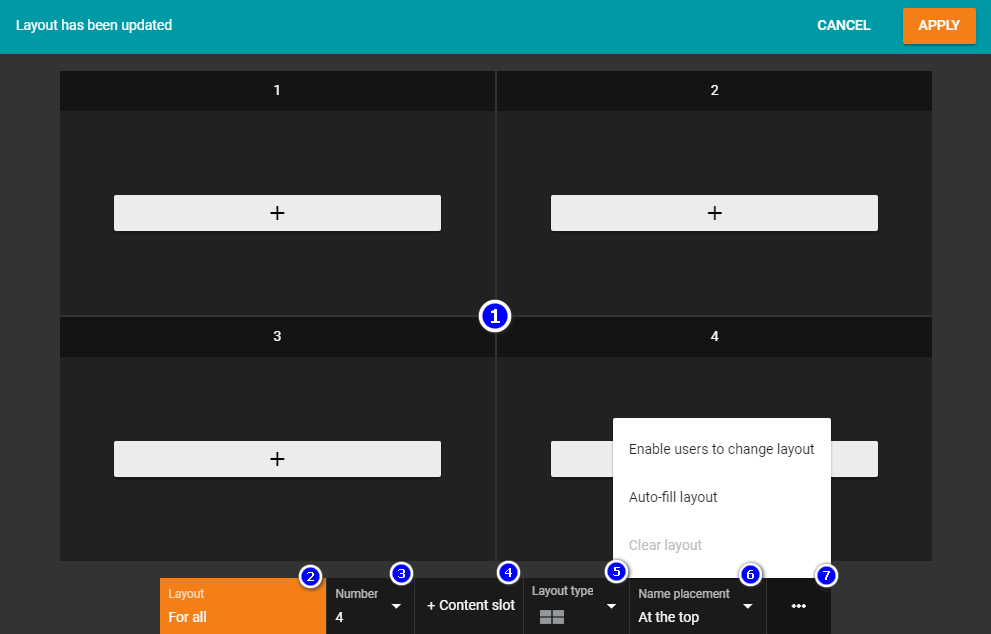
Participants' video windows
Layout mode
The number of video windows in the layout
Content window in the layout
Layout type
Where to display participant’s name in the video window
Additional settings:
forbidding users to change the video layout
filling in the layout automatically
discarding the layout.
After you have adjusted the layout, click Apply.
If you want to enable meeting participants to decline the layout you have applied, select Enable users to change layout in the additional settings when setting up the video layout.
How to rename a participant
You can change the display name for any participant displayed in the video layout. The changes will be applied to the current video layout only and will not affect the user’s name in the address book:
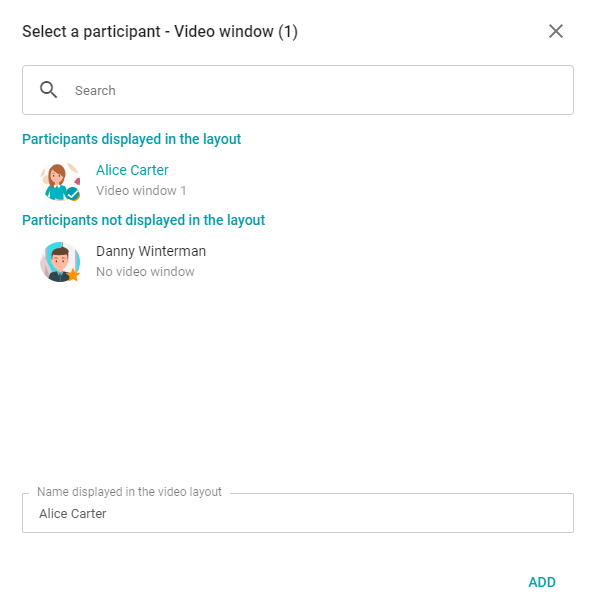
After you have filled all video windows, right-click on any of them and select Change to change the display name for the selected user.
How to add a content window
To add an additional video window where your content or slides will be displayed, click + Content slot when creating the layout.
Managing participants' audio and video devices
To start managing user devices:
Go to the advanced conference management section.
Set the video layout and apply it.
Click on the
 button in the upper right corner of the configured layout window and select Show participant control buttons.
The corresponding buttons will appear in on top of the participants ' panes:
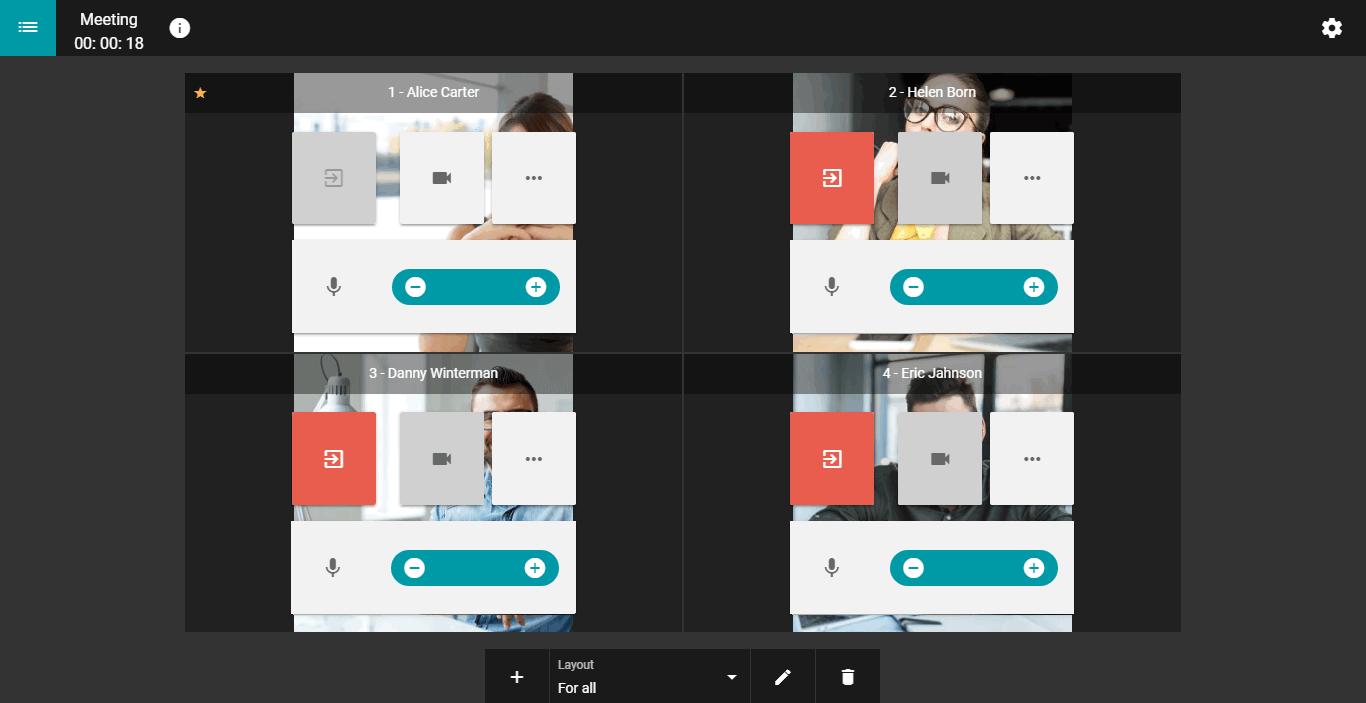
 — remove a participant from the conference.
 — enable/disable camera.
 — mute/unmute microphone.
 — turn the volume up/down.
 — advanced features, such as:
change video layout
disable camera
mute microphone
configure audio/video devices
assign a moderator
remove a user from the video layout
delete a user from the conference
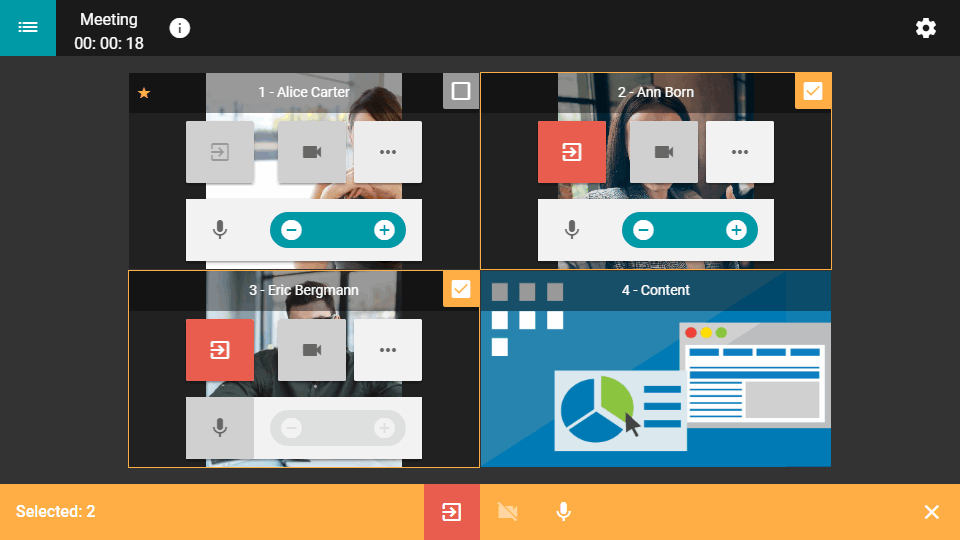
select a user.
When selecting multiple participants, a toolbar will appear at the bottom of the window, where you can disable receiving audio/video for the selected participants, as well as remove them from the meeting.
In addition, you can manage devices of the participants that are not displayed in the video layout and add new users to the conference by clicking the  button in the upper left corner of the window.
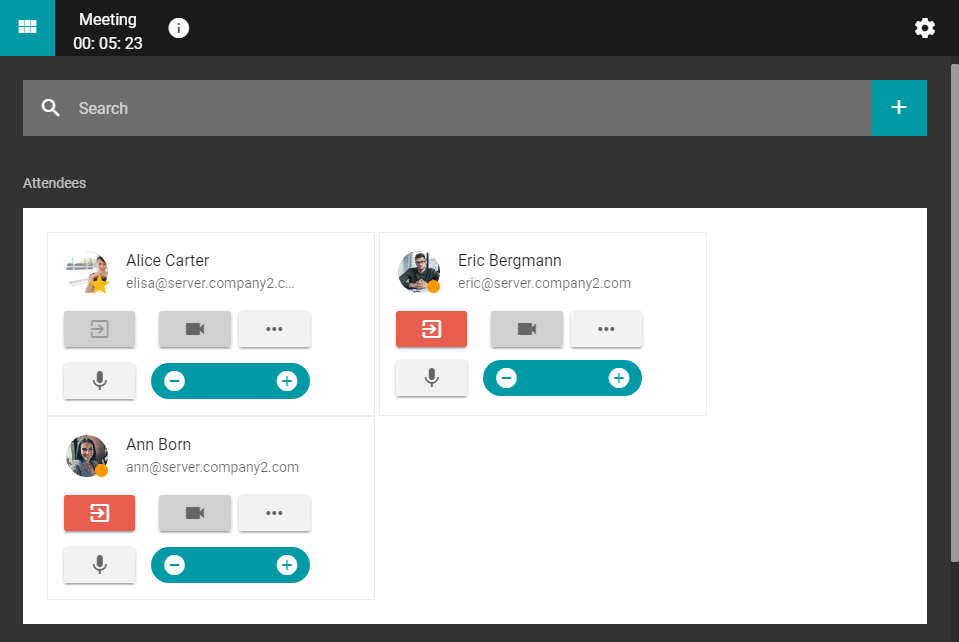
Add a new participant to a conference
You can invite users to an ongoing meeting. To do this, open the list of participants and press the  button to the right of the search bar.
The window for adding users will open. There you can select users in the same way as you would when creating a conference.
How to view conference details
You can view your meeting details in the advanced meeting management section by clicking the  button in the top left corner. You will see a window with detailed information about the meeting, as well as a button to end the call.
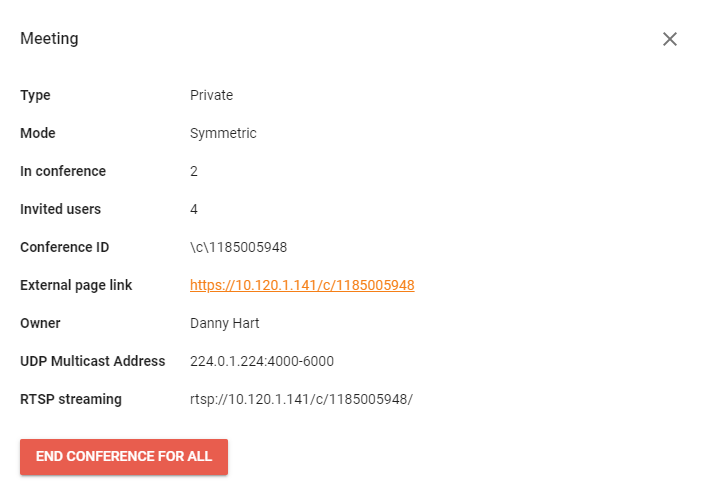
UDP Multicast and RTSP stream addresses are only displayed if the administrator has configured the appropriate settings when creating a meeting in the TrueConf Server control panel.
Templates
Use templates to create conferences with a set of identical parameters.
Set up a schedule on the General tab to hold the same conference on a regular basis.
To add a template, use Create a template button in the upper right corner of the Templates section. You can also save your conference as a template when creating it.
To use a template, select it in the Templates section and create a conference using the buttons in the panel on the right. You can also edit or delete the selected template.
Address book
Go to the Contacts section to view and edit the address book.
You can select any contact to call or start chatting. To contact a user, you will need a client application which can be downloaded by clicking the Download the application link in the personal area menu.
You will be able to edit the address book only if this right is given to you by the administrator.